 16 BEST OPENBOX PIPEMENUS 16 BEST OPENBOX PIPEMENUS
 The 16 best openbox-pcmanfm pipemenu entries are illustrated in an open schema-root-menu in the image below. They are primarily in the groups labeled Places and Pipe Menus. The two exceptions are Monitor Settings and Html. Monitor Settings is one of the 16 pipe menus, and Html is written as a Category in the schema. Several of these pipe menus are simply sub-schemas and could be directly written into the root menu schema in the form of a category, as was done with the Html submenu. Here, Html is just a small reference menu that I created to match my own special needs, and, thus likely not worth publisizing. In general it is not desirable to create new categories in the main root schema, because schemas are very sensitive to errors, especially punctuation and grammatical ones, and so it is wise to keep them small and infrequently edited.
The great advantage of the Openbox Window Manager, besides being light, fast and stable, is the ease of adding almost any computer operation that you can imagine to the menu. Because Openbox has been in existence for a long time, a considerable number of menu enhancements have been developed. This eliminates the need for big, heavy GUI's that usually are limited in the little boxes offered up. With openbox, the user can usually write or find a little text script that he can attach to the menu to get precisely the job done that he wants done.

| PipeMenu Entries in schema.pl | Download from lxlinux |
|---|---|
| {pipe => ['pcmanfm-bookmarks.pl', 'Bookmarks', '']}, | curl -O http://lxlinux.com/pcmanfm-bookmarks.pl |
| {pipe => ['bl-kb-pipemenu', 'Keybinds', '']}, | curl -O http://lxlinux.com/keybinds-pipemenu.tar.xz |
| {pipe => ['dir-menu.py', 'Computer', '']}, | curl -O http://lxlinux.com/dir-menu.py |
| {pipe => ['cbpp-places-pipemenu', 'Home', '']}, | curl -O http://lxlinux.com/cbpp-places-pipemenu |
| {pipe => ['ffmpeg-pipemenu', 'Ffmpeg', '']}, | curl -O http://lxlinux.com/ffmpeg-pipemenu.tar.gz |
| {pipe => ['help-pipemenu', 'Help', '']}, | curl -O http://lxlinux.com/help.tar.gz |
| {pipe => ['imagemagick-pipemenu', 'Image Magick', '']}, | curl -O http://lxlinux.com/imagemagick-pipemenu |
| {pipe => ['impipemenu', 'Image Magick Scripts', '']}, | curl -O http://lxlinux.com/imagemagicpipemenu.tar.gz |
| {pipe => ['obdevicemenu', 'Media', '']}, | curl -O http://lxlinux.com/obdevicemenu.tar.xz |
| {pipe => ['ob-randr.py', 'Monitor Settings', '']}, | curl -O http://lxlinux.com/ob-randr.py |
| {pipe => ['ob-sysinfo.pl', 'Sys-Info', '']}, | curl -O http://lxlinux.com/ob-sysinfo.pl |
| {pipe => ['inxi-pipemenu', 'Sys-Inxi-Info', '']}, | curl -O http://lxlinux.com/inxi-pipemenu |
| {pipe => ['storageinfo', 'Storage', '']}, | curl -O http://lxlinux.com/storageinfo |
| {pipe => ['bash-pipemenu', 'Bash Command Template', '']}, | curl -O http://lxlinux.com/bash-pipemenu |
| {pipe => ['obrecent.sh', 'Recent', '']}, | (everything needed given below) |
| {pipe => ['scrot-pipemenu', 'scrot', '']}, | (everything needed given below) |
| Needed by Most Pipemenus | |
| config.pl (put in /usr/lib/pipes-common) | curl -O http://lxlinux.com/config.pl |
| pipe-include.config (put in /usr/lib/pipes-common) | curl -O http://lxlinux.com/pipe-include.config |
In the box on the right are the commands (without icons being designated) that generate these 16 pipemenus, and commands for downloading the files. Copy and paste the entry in the first column into your ~/.config/obmenu-generator/schema.pl where-ever you want the pipe menu located. The right side of the table with yellow background is a command to download the files for that pipemenu. If curl doesn't work, replace curl -O in these commands with wget, and retry. Of course, curl and/or wget have to be installed on your computer.
Since it is customary in Debian-based Linux distributions to put the primary pipemenu script in /opt/menu, we make it the rule, and put all the main scripts there. Then, we put /opt/menu on-the=path to reduce verbage. Putting a directory on the path can be usually accomplished by appropriately adding its path to the list in /etc/environment, and editing /etc/profile so that the line near the top reads: else PATH="/usr/local/bin:/usr/bin:/bin:/usr/local/games:/usr/games:/opt/menu:/usr/local/im".
The core of several of these pipe menus was developed or improved by the people who were part of the once popular, but now defunct, Crunchbang GNU/Linux distribution. Two small files, config.pl and pipe-include.cfg, are essential in the functioning of these pipemenus. Make a directory: sudo mkdir /usr/lib/pipes-common, and put config.pl and pipe-include.config into it. Be sure that they are executable. About all that remains is to download the pipemenu files and put them in the correct directories. In what follows below we will speak to this for each pipemenu.
Not often, but occasionally, a launch script is not compatible with a computer system, especially when it comes to putting launchers on panels, desktops, keybindings, etc. There is an easy work-around that appears to work for all pipemenus. We will illustrate it here by showing how to do it for obdevicemenu.
To get a script launcher, you need to have xdotool installed. Create the shell script named obdevicemenu2 in the first box on the right. Name it obdevicemenu2, make it executable and put it in /usr/local/bin (on the path). You can give it any name, except obdevicemenu, because obdevicemenu has already been used. Your computer will rebel if you give the same name to two different executable files, both of which are on the path.
| Generic App | Alternative |
| image viewer | x-image-viewer |
| media player | x-media-player |
| terminal | x-terminal-emulator |
| text editor | x-text-editor |
| web browser | x-www-browser |
Finally, if any of the pipemenus refers to a computer application in its script, we have set-up the script in terms of generic alternatives, according to the associations listed in the table on the right. The user needs to be sure these alternatives have been established and are directed toward their own installed applications, respectively. This eliminates the need to edit each file to match the users applications. On a different note, I have maintained pcmanfm as file manager in all these pipemenu scripts. If you use a different file browser, then you will have to edit each script changing pcmanfm to the name of your file manager. There is no guarantee the pipe menu will work for other file managers.
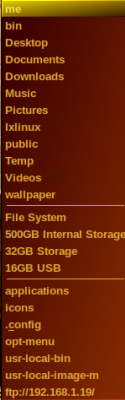
The pcmanfm bookmarks pipemenu consists of one file, pcmanfm-bookmarks.pl. Put pcmanfm-bookmarks.pl into /opt/menu, and make it executable. An image of the open menu is pictured on the left. The top 2 sections are static and can be easily edited by opening pcmanfm-bookmarks.pl with a root text editor and making the desired changes. Any directory on your computer can be put in these sections or in new similar sections. I've included the primary sub-directories of my home directory, which is named "me" in the top group. In the second group is the filesystem directory and 3 fixed external drives, which are always mounted at the same place, so have a fixed address to use in the menu. You will want to edit these 2 groups to your own situation and likening. The bottom section is the dynamical bookmarks group, which you do not want to edit, because it will automatically add or remove an item as you change your pcmanfm bookmarks. A time dependent list of pcmanfm bookmarks is kept at ~/.config/gtk-3.0/bookmarks. Besides an entry in the root menu, I attach "pcmanfm-bookmarks" to the keybinding "Alt+b" as described above, and then put a launcher on a panel using pcmanfm-bookmarks2, appropriately constructed as described for obdevicemenu2 above.
 Pcmanfm Bookmarks |
 |
 Places (~) Pipemenu |
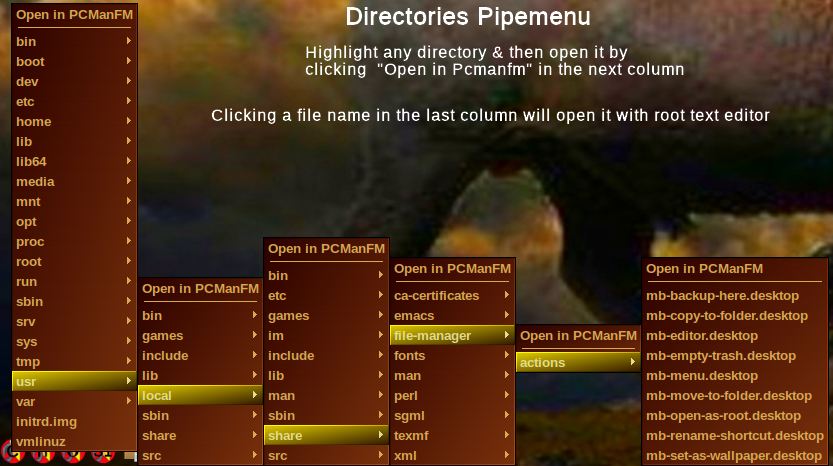
2. Directories PipemenuPut dir-menu.py into /opt/menu, , and make it executable. This pipemenu is an edited version of the one that comes with Sparky Linux. It is formulated in terms of alternative applications. A picture is above. |
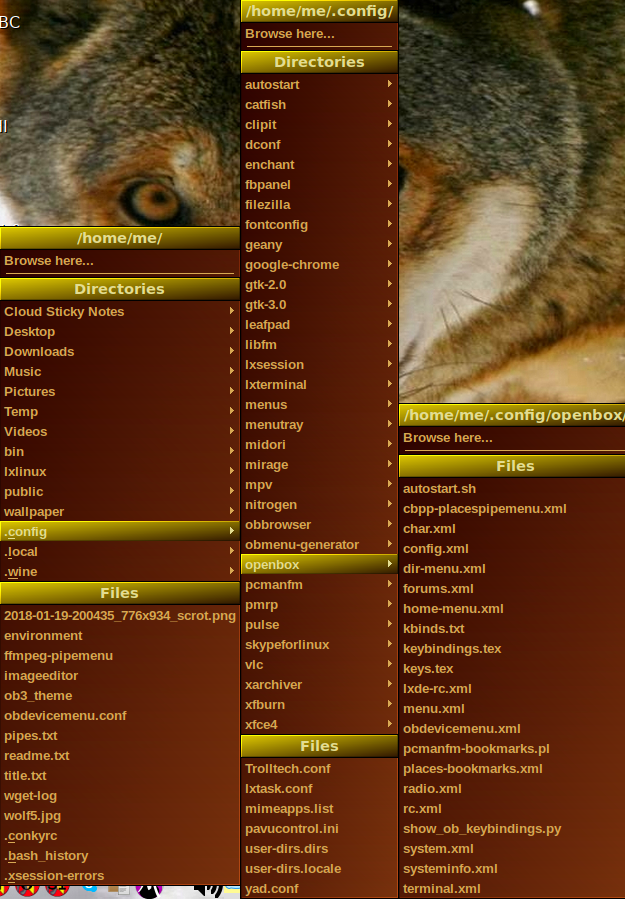
3. Places PipemenuPut cbpp-places-pipemenu into /opt/menu, and make it executable. This pipemenu is the John Crawley Crunchbang version adapted by Ben Young for Crunchbang++. It requires the installation of exo-utils and xdg-utils, and uses the x-text-editor alternative. It is programmed to show the following dot-files: .bash_history .bbtools .cache .config .conkyrc .local .themes .wine, but this list can be easily edited by the user. A picture is on the left. | |
4. ObdevicemenuExtract the 6 files in obdevicemenu.tar.xz, and follow the directions in "readme-obdevicemenu.txt". A photo of a Devices Pipemenu is below.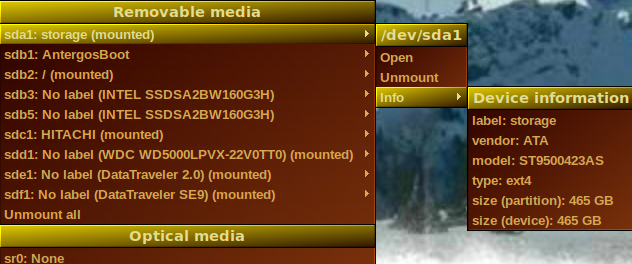 | >
5. Obrecent Pipemenu | |
Obrecent.sh, on the right, was copied from the Sparky Linux distribution. Copy and paste it to a text file, make it executable and put it in /opt/menu. A picture of a "recent files" list is below. Any file on this list can be relaunched by clicking its name.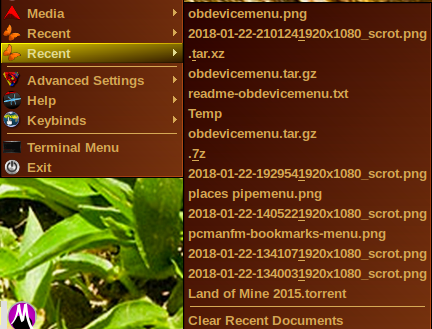 |
#!/bin/sh
obrecent.shecho "<openbox_pipe_menu>" files=$( cat ~/.local/share/recently-used.xbel | grep file:/// | tail -n15 | cut -d "\"" -f 2 | tac | while read line; do file=$(echo "$line") name=$(echo -en "$file" | sed 's,.*/,,' | sed 's/%20/ /g') echo "<item label=\"$name\"> <action name=\"Execute\"><command>xdg-open $line</command> </action> </item>" done); echo "$files" echo "<separator />" echo "<item label=\"Clear Recent Documents\"> <action name=\"Execute\"> <command>rm ~/.local/share/recently-used.xbel</command> </action> </item>" echo "</openbox_pipe_menu>" |
6. Scrot PipemenuCopy and paste the text in the yellow box below to a text file, make it executable, name it "scrot-pipemenu" and put it in /usr/menu. Launching scrot with only one click from a menu like shown in the below image is much faster than using a clumsy, heavy GUI.
#!/bin/bash # scrot-pipemenu COMMON_LIBDIR='/usr/lib/pipes-common' if ! . "$COMMON_LIBDIR/pipe-include.cfg" 2> /dev/null; then echo $"Error: Failed to locate include.cfg in $COMMON_LIBDIR" >&2 exit 1 fi menuStart #menuSeparator 'Scrot' menuSeparator menuItem 'Screen' 'scrot -q 90 -e "x-image-viewer $f"' menuItem 'In 15 Seconds' 'scrot -q 90 -d 15 -e "x-image-viewer $f"' menuItem 'Area (drag mouse)' 'scrot -q 90 -s -e "x-image-viewer $f"' menuItem 'Window (click win)' 'scrot -q 90 -u -e "x-image-viewer $f"' menuItem 'Multi-Monitor' 'scrot -q 90 -m -e "x-image-viewer $f"' menuSeparator menuEnd 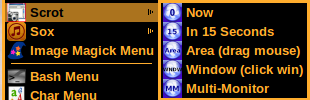 Scrot Pipemenu |
7. Help PipemenuDownload help-tar.gz, extract the contents and follow the instructions in the read-me file. A photo of the Help Pipemenu that you downloaded is below. The core of the script came from the Bunsenlabs Distribution. 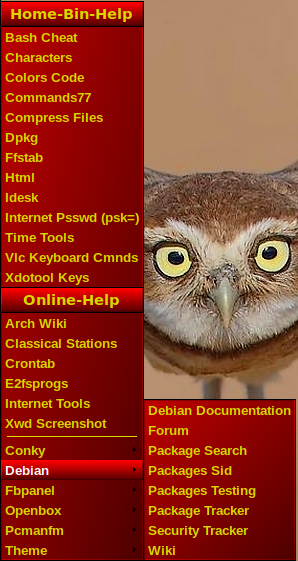 Help Pipemenu |
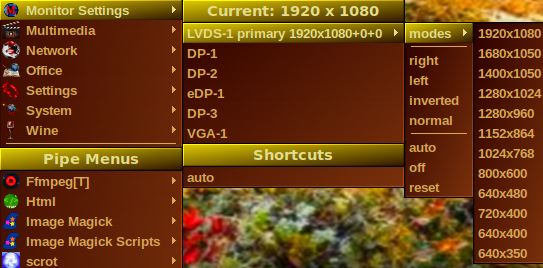
Make ob-randr.py executable, and put it in /opt/menu. This python script was written by Seth Howard. Custom commands can be added to the menu by creating ~/.ob-randrrc, and editing it as described in the introductory part of ob-randr.py. A basic "Monitor Settings" menu is shown on the left.
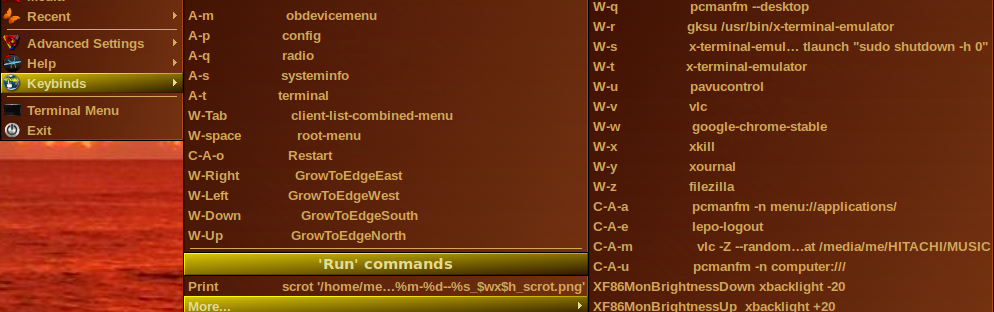
Extract the 5 files in keybinds-pipemenu.tar.xz, and follow the directions in "readme-keybinds.txt, which is one of the files. A photo of part of a Keybinds Pipemenu is below. The script was written for BunsenLabs Linux by damo and is based upon a script by wlourf 07/03/2010.
10. Ffmpeg Pipemenu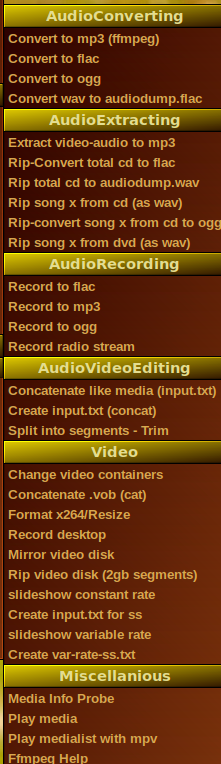 Extract the contents of ffmpeg-pipemenu.tar.gz, and follow the directions in the included readme text file. Ffmpeg is the ultimate command-line tool for converting, editing and configuring multimedia formats. Ffmpeg-pipemenu is a tool for putting the right ffmpeg command in the terminal for about 30 of the most common multimedia tasks. The 30 tasks can be easily changed in ffmpeg-pipemenu to the user's preferences. In addition to ffmpeg, ffmpeg pipemenu requires xdotool, mplayer, vobcopy and flac be installed. Open a terminal, then open the ffmpeg menu and click the desired function. A skeleton command will automatically be typed into the terminal. Complete the command and run it. |
11. Image Magic Pipemenu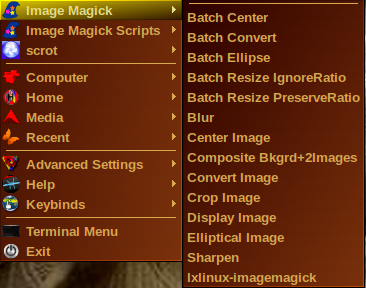 Image Magick is the ultimate command line tool for converting, combining and general editing of images. ImageMagick-pipemenu is a tool for putting a skeleton of the right command in the terminal for 13 of the most common tasks. These commands can be easily edited in imagemagick-pipemenu to the user's prefrence. To use the Image Magick pipemenu, open a terminal, then open the Image Magic desired function. A skeleton command will automatically be typed into the terminal. Complete the command and press "enter" key to carry it out. Basic Image Magick information is available at Lxlinux |
12. Image Magic Scripts Pipemenu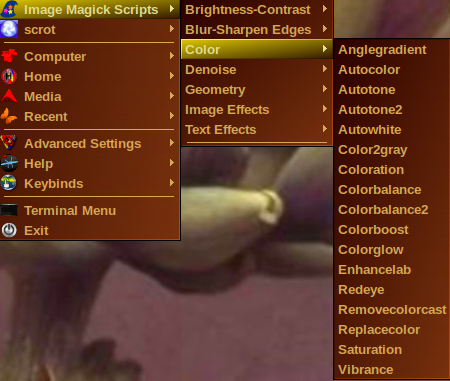 These are abbreviated copies of 75 of Fred Weinhaus's terrific image magick exec scripts for running image magick edits. These include the exact commands to use and their effect on real images. The commands that launch the tools are in the im directory. The information about what each tool does with the exact commands to use to get the illustrated effect is in the imagemagick directory. These 2 directories will occupy about 52MiB on your computer. You need to put the im directory in a directory that is on the path. I put it in /usr/local, and then put /usr/local/im on the path. Be sure the files in im are executable: sudo chmod 755 /usr/local/im/*. Put the imagemagick directory in ~/bin. To use the pipemenu, open up the menu, scroll to the item that you think might contain the photo edit that your picture needs, click on it. This will bring up an abbreviated Fred script complete with illustrative photos and exact commands. All you need to do is copy and paste the command, perhaps changing a number or two, add the name of the input photo and a different name for the edited output photo, and run it in a terminal: fredscommand imput output. If the desired end is not achieved, redo using a different set of parameters. You can redo starting with either the new (output) or original (input) image. If you do not enter a new name in the output field, the original image will be overwritten with the edited version. |
13. System Information Pipemenu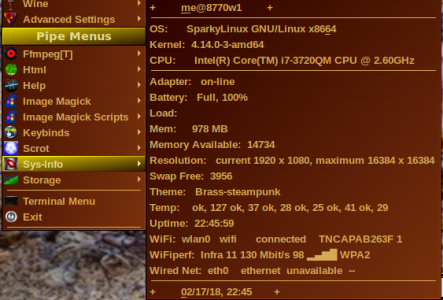 |
14. System Storage Pipemenu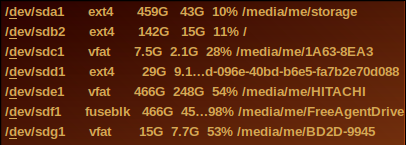 Download the pipe menus for system information and system storage, put them in /opt/menu, make them executable and put the appropriate entry in schema.pl as described in the chart at the top. These are expanded and modified versions of similarly named pipe menus found on the Openbox Wiki. The Systems Information Pipemenu is an old script, and modern systems may need to have their perl scripts supplemented. I found installing the following small perl libraries worked on my Sparky system: |

This menu is a list of skeleton commands and complete commands that are commonly used in Linux. It is really a crutch for beginners and others to get the exact communication to put into the terminal to achieve some kind of objective. Communicating with your computer with words requires an exact and correct formulation of the command. Having at least a skeleton of the command readily available can often save a lot of time and frustration. Of course, a user needs at least a rudimentary knowledge of the command language to use some of these skeletons, and that knowledge should naturally occur over time provided he actually uses the terminal. The "Bash Pipemenu" can ease the learning process. Learning a computer language is just like learning any language - vocabulary, structure, grammer, etc.
Download bash-pipemenu, put it in /opt/menu and make it executable. To use the menu, bring up a terminal and cd to the directory that contains the pertinent files if appropriate. The first 8 commands in the pipe menu are complete, so clicking the one you want to use will enter the complete command in the terminal. All that remains to carry it out is to press the enter key and enter your password if called for.
Clicking Command 9, Remove-purge, will put the following in the terminal: me@8770w1:~$ sudo apt-get remove --purge input. To complete the command, you will need to replace "input" with the name of the app that you want to remove. Then press the enter key. Most of the commands require only entering "input" and/or "output" names. The most complicated ones are those in the "Special Commands" section, which will require a little more effort.
Of course, a user can easily edit bash-pipemenu to add new commands or remove unused entries. Each command occupies 1 line in bash-pipemenu. Just follow exactly the format illustrated by the lines already in the menu. Care must be taken when editing any menu schema file, because one error, left-out-comma, etc will kill the complete menu.
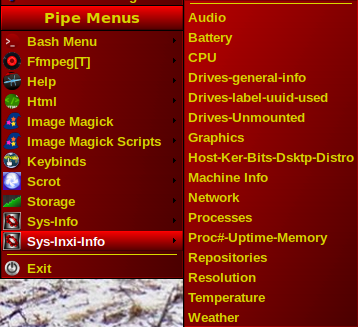
The pipemenu can be downloaded from this website as described in the beginning above. Put inxi-pipemenu in /opt/menu (on the path), make it executable and add it to your schema root menu as described above.
The image on the left shows the 16 items built into the pipe-menu. These include a simple "weather" indicator, which you will need to edit for your area by supplying a zip code or city name. Put man inxi into the terminal to see all the inxi features.
Linux Openbox & Pcmanfm Guide