OPENBOX ROOT MENU, SUB-MENUS, PIPE MENUS OPENBOX ROOT MENU, SUB-MENUS, PIPE MENUS
 The default menu for the openbox windows manager, which is known as the root menu, is completely static, which means all changes in it are done manually. Right clicking on an empty spot of the desktop will launch it. This root menus that come with the lxde desktop and other systems containing openbox is generally pathetic. However, with just a little work, the root menu can be replaced with a relatively dynamic root menu, which means applications are automatically added or removed, and just about every operation involving the computer can be included on the menu. It can be made easily into much more than just an application launcher. Furthermore, it can be constructed with a series of static and dynamical submenus that will put most of the app launchers and text config files within one left-click after the root menu is launched, thus, still leaving a clean, neat desktop. The only structure that is might be quicker would be having a desktop cluttered with individual desktop and panel launchers. The purpose of this essay is to show in straight forward easy steps how to construct a viable root menu from scratch. All that is required is a text editor.
A template for the start and ending of any static menu.xml is illustrated in the box, Chart 1, on the right. To make a menu, root or otherwise, the user needs to choose a menu id, label, icon and create the menu substance, which is illustrated by "......" in Chart 1.
For a static root menu one always chooses menu id="root-menu" label="Openbox 3", and leaves out the icon. There can be only one root menu, and no other menu (submenu) in a configuration can have id="root-menu". Otherwise, the user can choose anything for the id, label or icon (path to icon) of additional menus (non-root menus) provided no id is used more than once.
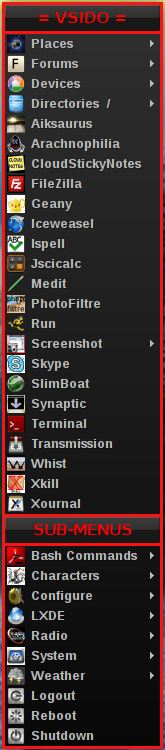
The substance of the root-menu consists of items that launch applications, computer process information, directories, internet websites, etc - anything for which a launch code can be created - and submenus, which can be either dynamic (computer created) or static (user created). To illustrate the various possibilities, we will start by showing an example root-menu and then describe how each item comes about. Image 1 on the left is one of my root-menus, and Chart 2 on its right is the essence of the menu.xml that generates that menu.
The separator tag allows the menu to be shown in sections. It can be used without a label (<separator />), which just puts in a horizontal line, or with a label (<separator label="LABEL" />), which shows LABEL in the menu as illustrated twice in Image 1 and Chart 2.
The applications to appear directly on the menu are entered as items, which requires a 7 line entry for each app. The format is illustrated by the 7 line entries that begin with <item label= ... in Chart 2. See, for example, the entries for Aiksaurus and Arachnophlia. For each app the user can choose any label or icon that he wishes. Icons are generally stored in /usr/share/icons/. The key to getting an application or process on the menu correctly is what's between the <command> and </command> tags. For linux applications installed by sudo apt-get, Synaptic or gdebi, it will usually be the name used to install the app. The exact command in this situation is the exec in the .desktop file that usually gets automatically installed with a linux app. These are usually put in /usr/share/applications/. For Wine applications, it will be wine path-to-.exe, and for Java applications, it will be usually java path-to-.jar. For applications launched as root, prefix the app-exec with gksudo. See the LXDE-OPENBOX Guide for more information on the subject of determining commands or execs.
The above menu example contains 20 favorite applications (includes screenshot), 11 submenus, of which 4 (Devices, Directories, LXDE, Weather) are dynamical (determined automatically by the computer) and 7 (Bash Commands, Characters, Configure, Forums, Places, Radio, System) are static (constructed by user), plus ("logout", "reboot" and "shutdown"). Any of these is removed by simply deleting its section. New ones can be added by constructing appropriate entries. Any formatting errors, punctuation or otherwise, will render the total menu inopperative, so care needs to be taken in constructing and editing menus. Submenus in the root-menu involve only 1 line and are color coded green (static) and blue (dynamic) simply to help the reader.
To have icons on your menu entries, the path to the desired icon will have to be spelled out following the pattern in the menu. I use my own icons collected over the years, putting them in /usr/share/icons, so you are unlikely to have all of the icons named in Chart 2. You can use any square .png image, usually about 64x64 in size, as an icon. Make your own and put them in /usr/share/icons.
As you can see from Chart 2, the difference between static submenu entries (green) and dynamic submenu entries (blue) is that the dynamical entries require an execute. This identifies the program that determines that submenu and what makes it dynamical. The user is the "execute" in the static submenus, and so he manually has to construct them. A program does the "execute" in the dynamical menu. Otherwise, the formats of both are identical to Chart 2. The only difference to the root-menu is that with submenus the user has no restrictions in completing menu id="" label="" icon="" execute="", provided that no two labels are the same. For example, the Characters submenu is generated by char.xml has in its heading:
<menu id="char" label="Characters" icon="/usr/share/icons/ascii.png">,
while the Devices submenu is generated by the computer program, obdevicemenu, and has in its heading:
<menu id="devices" label="Devices" icon="/usr/share/icons/dp.png" execute="/opt/menu/obdevicemenu" />.
All the submenu ".xml" files, such as char.xml are stored in ~/.config/openbox/, whereas the computer programs generating the dynamical menus can be in a variety of places.
One additional edit has to be performed to complete the process in the case of a static submenu. For each menu defined by a .xml file, a line has to be added to the menu section of ~/.config/openbox/rc.xml. It basically tells openbox where to find the .xml files for the submenus. For the format for entering the appropriate submenus in Chart 2 in the corresponding rc.xml, see Chart 3.
Most Debian-based Linux Distributions come with a special Debian applications menu.xml file that often is not activated. It is generally found as /var/lib/openbox/debian-menu.xml and can be activated by removing the deactivation buttons (delete <!-- and -->, which enclose /var/lib/openbox/debian-menu.xml in rc.xml). See Chart 3 above. Add the following line in the openbox root-menu where you want the DebianApps Menu to appear (See Image 2):
<menu id="/Debian" label='Debian' icon='/usr/share/icons/debian.png' />.
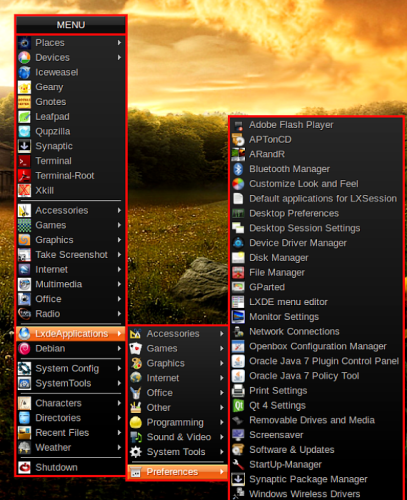 |  ← LXDE Applications Menu as a Dynamical Submenu of Openbox Root-menu Image 2. |
 Control+Alternate+l to launch Lxde Applications Menu | 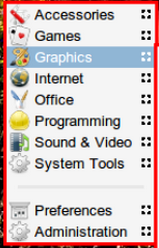 Control+Alternate+s to launch Semplice Applications Menu |
|
<!--Keybindings for running applications-->
<keybind key="C-A-a"> <action name="Execute"> <startupnotify> <enabled>true</enabled> <name>pcmanfm-menu</name> </startupnotify> <command>pcmanfm -n menu://applications/</command> </action> </keybind> If a launch code is available for a menu, then a keybinding launcher can be established as an application. The format for an application keybinding requires 9 lines and is illustrated in Chart 5. Chart 5 is the code for assigning Ctrl+Alt+a to launch the pcmanfm applications menu, which offers a nice Category Menu, a Bookmarks Menu, a Devices Menu and a Places Menu in one package. This eliminates the need for additional pipemenus to express the last 3. It's only disadvantage is that a category's contents cannot be seen by just passing the mouse pointer on its name. You have to actually click the category to see what apps are in that category. This is similar to the popular xfdashboard menu, which is only an app category launcher, and has the additional disadvantage of occupying the whole screen when launched.
#!/bin/bash
xdotool key "ctrl+alt+a" & exit A panel launcher for the Pcmanfm Menu can be created by using xdotool. Copy and paste the code in Chart 6 on the left into a text file, name it pcmanfm-menu, make it executable and put it in /usr/local/bin. The command pcmanfm-menu will now launch the menu provided this keybinding has been bound to the menu as in Chart 5. Command launchers for any menu that has a keybinding launcher can be created this way. | 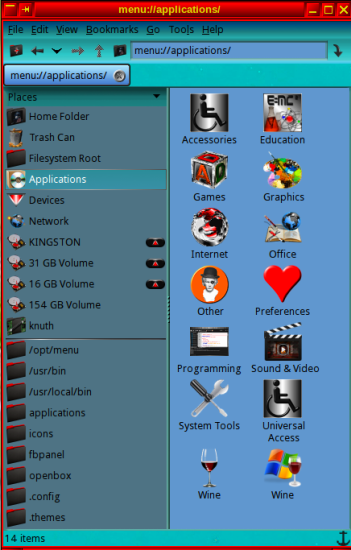 |
|
#!/bin/sh echo "<openbox_pipe_menu>" files=$( cat ~/.local/share/recently-used.xbel | grep file:/// | tail -n15 | cut -d "\"" -f 2 | tac | while read line; do file=$(echo "$line") name=$(echo -en "$file" | sed 's,.*/,,' | sed 's/%20/ /g') echo "<item label=\"$name\"> <action name=\"Execute\"><command>xdg-open $line</command></action> </item>" done); echo "$files" echo "<separator />" echo "<item label=\"Clear Recent Documents\"> <action name=\"Execute\"><command>rm ~/.local/share/recently-used.xbel</command></action> </item>" echo "</openbox_pipe_menu>" | 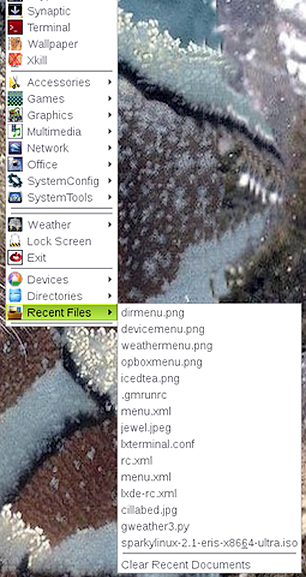 |
|
Copy and paste the script in Chart 7 to any text file, name it obrecent.sh and save it in /opt/menu. If this directory does not already exist in your distribution, then create it (as root).
Make obrecent.sh executable. Finally, add The script below was copied from the Sparky Linux distribution. |
|
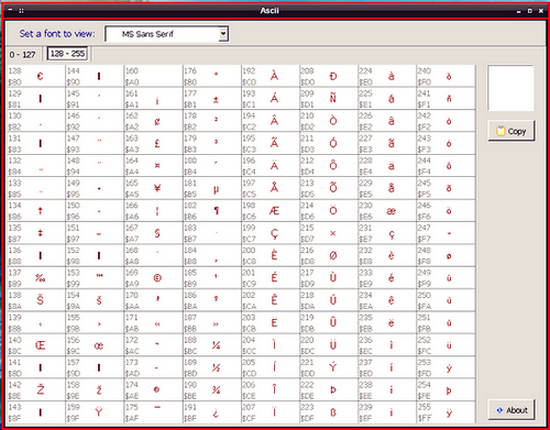
A small tool named xdotool (see LXDE-Openbox Guide) can be used to create an exec for special characters. This allows a Character Map submenu to be easily added to the root-menu. Copy, paste and save the text in Chart 8 as char.xml, and put it in ~/.config/openbox/. Put the following into the root-menu (~/.config/openbox/menu.xml) wherever you want Characters to appear: To enter a character on any text or document, place the cursor where you want the character to go, open up the Characters submenu and left click the desired character. If there is a capital version and that is what you want, then hold the shift key down when you click the character, just as in normal typing. I created the icons by using scrot to copy an image of the capital version of the characters from gucharmap. I added Ascii-char software link at the bottom of the characters submenu to have easy access to characters not listed. The much heavier and more complete, but clumsier to use, Gucharmap could replace Ascii-char. See the Ascii-char image below. Ascii.exe can be downloaded from this website using wget and run using wine: 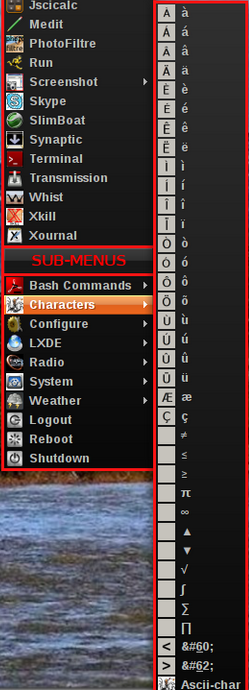 You can download copies of the character icons one at a time from this website by going to If wget is installed, then coping, pasting and executing the following into your terminal should create a file, ~/characters, containing all the character icons in one step:
 Ascii-char Terminal MenuBecause terminal commands have to be exact, I have found that having a submenu that can be clicked to enter at least most of a command is a big aide. So I created a submenu for many of the most-used commands. All it does is uses xdotool to do the typing for me, which I duly appreciate. The xml-file is called terminal.xml and can be downloaded from this website  Image 4. Terminal Command Submenu Winfuncs Tiler for OpenboxThere are several programs that can help organize (tile) the open windows in Openbox. One is pytyle, which is described at the end of After Installing Openbox; another is x-tile. However, my favorite is a simple script, which in various forms has been floating around the forums for quite awhile. It is called Winfuncs and can be downloaded from this website using wget: |
<?xml version="1.0" encoding="UTF-8"?>
<openbox_menu xmlns="http://openbox.org/" xmlns:xsi="http://www.w3.org/2001/XMLSchema-instance" xsi:schemaLocation="http://openbox.org/ file:///usr/share/openbox/menu.xsd"> <menu id="char" label="Characters" icon="/usr/share/icons/ascii.png"> <item label="à" icon="/usr/share/icons/characters/01.png"> <action name="Execute"> <execute> xdotool type à </execute> </action> </item> <item label="á" icon="/usr/share/icons/characters/02.png"> <action name="Execute"> <execute> xdotool type á </execute> </action> </item> <item label="â" icon="/usr/share/icons/characters/03.png"> <action name="Execute"> <execute> xdotool type â </execute> </action> </item> <item label="ä" icon="/usr/share/icons/characters/04.png"> <action name="Execute"> <execute> xdotool type ä </execute> </action> </item> <item label="è" icon="/usr/share/icons/characters/05.png"> <action name="Execute"> <execute> xdotool type è </execute> </action> </item> <item label="é" icon="/usr/share/icons/characters/06.png"> <action name="Execute"> <execute> xdotool type é </execute> </action> </item> <item label="ê" icon="/usr/share/icons/characters/07.png"> <action name="Execute"> <execute> xdotool type ê </execute> </action> </item> <item label="ë" icon="/usr/share/icons/characters/08.png"> <action name="Execute"> <execute> xdotool type ë </execute> </action> </item> <item label="ì" icon="/usr/share/icons/characters/09.png"> <action name="Execute"> <execute> xdotool type ì </execute> </action> </item> <item label="í" icon="/usr/share/icons/characters/10.png"> <action name="Execute"> <execute> xdotool type í </execute> </action> </item> <item label="î" icon="/usr/share/icons/characters/11.png"> <action name="Execute"> <execute> xdotool type î </execute> </action> </item> <item label="ï" icon="/usr/share/icons/characters/12.png"> <action name="Execute"> <execute> xdotool type ï </execute> </action> </item> <item label="ò" icon="/usr/share/icons/characters/13.png"> <action name="Execute"> <execute> xdotool type ò </execute> </action> </item> <item label="ó" icon="/usr/share/icons/characters/14.png"> <action name="Execute"> <execute> xdotool type ó </execute> </action> </item> <item label="ô" icon="/usr/share/icons/characters/15.png"> <action name="Execute"> <execute> xdotool type ô </execute> </action> </item> <item label="õ" icon="/usr/share/icons/characters/16.png"> <action name="Execute"> <execute> xdotool type õ </execute> </action> </item> <item label="ù" icon="/usr/share/icons/characters/17.png"> <action name="Execute"> <execute> xdotool type ù </execute> </action> </item> <item label="ú" icon="/usr/share/icons/characters/18.png"> <action name="Execute"> <execute> xdotool type ú </execute> </action> </item> <item label="û" icon="/usr/share/icons/characters/19.png"> <action name="Execute"> <execute> xdotool type û </execute> </action> </item> <item label="ü" icon="/usr/share/icons/characters/20.png"> <action name="Execute"> <execute> xdotool type ü </execute> </action> </item> <item label="æ" icon="/usr/share/icons/characters/21.png"> <action name="Execute"> <execute> xdotool type æ </execute> </action> </item> <item label="ç" icon="/usr/share/icons/characters/22.png"> <action name="Execute"> <execute> xdotool type ç </execute> </action> </item> <item label="≠" icon="/usr/share/icons/characters/bg.png"> <action name="Execute"> <execute> xdotool type ≠ </execute> </action> </item> <item label="≤" icon="/usr/share/icons/characters/bg.png"> <action name="Execute"> <execute> xdotool type ≤ </execute> </action> </item> <item label="≥" icon="/usr/share/icons/characters/bg.png"> <action name="Execute"> <execute> xdotool type ≥ </execute> </action> </item> <item label="±" icon="/usr/share/icons/characters/bg.png"> <action name="Execute"> <execute> xdotool type ± </execute> </action> </item> <item label="∞" icon="/usr/share/icons/characters/bg.png"> <action name="Execute"> <execute> xdotool type ∞ </execute> </action> </item> <item label="▲" icon="/usr/share/icons/characters/bg.png"> <action name="Execute"> <execute> xdotool type ▲ </execute> </action> </item> <item label="▼" icon="/usr/share/icons/characters/bg.png"> <action name="Execute"> <execute> xdotool type ▼ </execute> </action> </item> <item label="√" icon="/usr/share/icons/characters/bg.png"> <action name="Execute"> <execute> xdotool type √ </execute> </action> </item> <item label="∫" icon="/usr/share/icons/characters/bg.png"> <action name="Execute"> <execute> xdotool type ∫ </execute> </action> </item> <item label="∑" icon="/usr/share/icons/characters/bg.png"> <action name="Execute"> <execute> xdotool type ∑ </execute> </action> </item> <item label="∏" icon="/usr/share/icons/characters/bg.png"> <action name="Execute"> <execute> xdotool type ∏ </execute> </action> </item> <item label="<" icon="/usr/share/icons/characters/less.png"> <action name="Execute"> <execute> xdotool type < </execute> </action> </item> <item label=">" icon="/usr/share/icons/characters/greater.png"> <action name="Execute"> <execute> xdotool type > </execute> </action> </item> <item label="Ascii-char" icon="/usr/share/icons/ascii.png">> <action name="Execute"> <execute> wine /home/me/.wine/drive_c/"Program Files"/"RJ Ascii"/Ascii.exe </execute> </action> </item> </menu> </openbox_menu> |
Image 6 on the right shows my upper fbpanel icon launchers for the 5 wmfuncs modes. Left clicking the T icon instantly tiles the open windows; left clicking C cascades the windows, etc.
One pipemenu that I have found particularly time savings is a File-manager Bookmarks menu. I generally put it on a panel rather than in a root-menu, but either set-up is easy to construct. A bookmarks pipe-menu specifically for pcmanfm can be downloaded from this website:
wget http://lxlinux.com/pcmanfm-bookmarks.pl .
Move pcmanfm-bookmarks.pl to /opt/menu/, and make it executable. Next, use a text editor to create a menu, places-bookmarks.xml, as in Chart 1, using
<menu id="places-bookmarks" label="Places-Bookmarks" icon="/usr/share/icons/ultra-flat-icons/apps/scalable/bookmarks.svg" execute="/opt/menu/pcmanfm-bookmarks.pl" />.
This has an execute, so there are no items, and, of course, you will change the icon to one that is on your computer. Save places-bookmarks.xml in ~/.config/openbox/, and make it executable. Finally, put
<file>/home/me/.config/openbox/places-bookmarks.xml</file>
into the menu section of ~/.config/openbox/rc.xml.
This is sufficient to put the bookmarks menu in the root-menu as laid-out above, but if you want a desktop launcher, then an execute needs to be created. The best way to do this, and get a keybind launcher at the same time, is to create a keybind. I generally use Alt+F1 for the keybind, which requires entering the text in Chart 9 into the <!--Keybindings for menus--> section of rc.xml. Now, copy the text in Chart 6 above, changing "ctrl+alt+a" to "alt+F1", to a text file, name it bookmarks-menu, make it executable and put it in /usr/local/bin (on-the-path). The command (execute) bookmarks-menu will now launch the bookmarks menu. Use this execute to put the bookmarks menu on a panel, as illustrated in Image 6, or on the desktop for whatever your situation is.
As illustrated in Image 6, the bookmarks menu consists of 2 parts. The bottom part reflects the bookmarks entered into the Pcmanfm side panel by the user. This is done by left-clicking Bookmarks in the Pcmanfm heading and following the instructions. So these entries come and go automatically as the user chooses or deletes bookmarks. The upper part is static and built into pcmanfm-bookmarks.pl. To change them, edit pcmanfm-bookmarks.pl in the obvious manner suggested by the format.