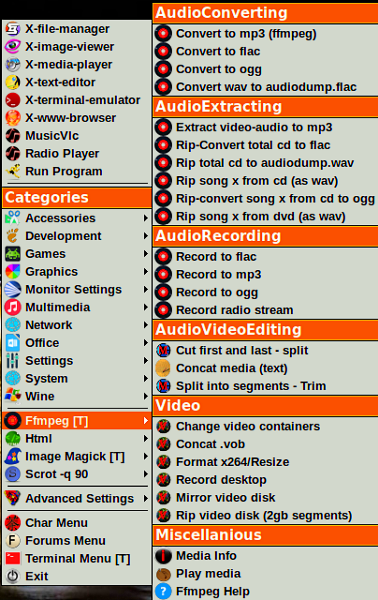
Image 1. Ffmpeg Submenu
Ffmpeg is the ultimate command-line tool for converting, editing and configuring multimedia formats. Most multimedia editing software of a geometrical nature (GUI's) rely upon ffmpeg as a backend, and only utilize a fraction of the ffmpeg tools available. Over the long run it is often easier and more fruitful to master a few basic commands for your every-day little edits, rely on the vast ffmpeg literature to help do more complicated editing and forgo the clumsy, heavy, limited GUI's. To help with the common every day edits, I use xdotool to put directly into the Obmenu (~/.config/obmenu-generator/schema.pl) a set of command templates as in Chart 1, which creates the menu shown in Image 1. To use one of these, put the relevant media files in one directory and open a terminal in that directory (cd [directory]). Then click the menu entry, which will type into the terminal the words shown in Chart 1 for that command. You still need to complete the specific details like media input names, output names and any additional format details that you might want to use. I'll say more about that below. Click the enter key and "bang!", there is the output in the same directory (unless you specify the output is to go elsewhere). What could be easier?
Editing media is complicated, and ffmpeg has been under development for a long time and by a lot of people. Sometimes what worked yesterday may not work today because of changes in either hardware or software. So patience is often needed and one should not be afraid of doing a little experimenting. Usually there is more than one way to achieve the same end. Also, there are different compilations of ffmpeg, and if the version that you install does not live up to expectation, then you should search for another version, or maybe a newer version.
The first thing one should do before editing a media file, especially videos which can involve multiple tracks, is obtain the key tecnical information about the file. You can either use ffmpeg or ffprobe. I prefer ffmpeg because the information is formulated in ways closer to command entries. The command for information concerning a particular media file is:
ffmpeg -probesize 1000000 -analyzeduration 1000000 -i input -hide_banner .
Here, -probesize 1000000 and -analyzeduration 2000000 limit the search to 1,000,000 bytes (about 1 Megabytes) or 2,000,000 microseconds (2 seconds), whichever occurs first. Specifying the search length to be large is insurance that the search will be deep and long enough to guarantee everything interesting is discovered. These tags can be also added in formatting commands, but with smaller numbers because the downside of larger numbers in formatting could be larger latency in the output file. The -hide_banner tag reduces the information returned by stripping out unnecessary stuff. This "Media Information" command is in the Miscellanious section of the submenu.
Most commands in Chart 1 are pretty well self-explanatory. A simple introduction for using ffmpeg to make video format changes and what that means is in the Linux Journal. The commands making up the above media menu were chosen to represent the basic operation that most of us would like to do but often do not have a tool with which to do it. What are the video edits most needed by amateur users? The answer is probably trimming, concatenating, extracting (ripping), format changing and trimming. An introduction to each set of commands as parceled out by the menu follows.
Audio converting is relatively simple. The main rule is not to make radical changes in the audio parameters. For example, audio quality is proportional to bit-rate, but increasing the bit-rate already established in an audio or video file is unlikely to effect quality and will only increase the size. On the other hand, if it starts large like 1280k (kb/s) or even 320k, then you can reasonably reduce it to something like 256k or even 128k (cd quality) without much loss of quality but with a great reduction in file size. The 4 commands all reflect high quality codecs and have bit-rate specified as 320k.
There are many apps available to Linux users to extract or rip audio or video from cd's, dvd's or videos. Two of the best are probably already on your computer as players, namely, vlc player and mplayer. Vlc is in the form of a GUI and mplayer is command line. Both are set-up to do high quality rips. In short, to use vlc, follow the following path filling out the direction boxes as you proceed:
Media > Open Disc > Show more options > Choose "Convert" from "Play" drop-down menu.
The 6 menu commands in this section use strictly ffmpeg in 2 instances (extract audio from a video, rip a complete cd), use strictly mplayer in 3 instances (rip complete cd or just tracks from a cd or dvd) and use a combination of the two in one instance, mplayer to rip and then ffmpeg to convert the mplayer output to a high quality ogg file. Normally the tracks on a cd or dvd are numbered and each number is labeled to describe the contents of that track. In the track rip commands, simply replace the "x" with the track number that you want to rip. So cdda://4 will rip just track 4, whereas cdda://4-7 will rip tracks 4 through 7. When the output from mplayer is not named, it defaults to naming it audiodump.wav. When you use the menu rip-convert command, a audiodump.wav file will be also created and saved. However, you do not need to worry about such files collecting to fill up valuable hard drive space (should you forget to delete), because each succeeding one just over-writes the previous one, so there will never be more than one.
The 4 audio record commands are not directory dependant (can be launched from your home directory without undue bother). So I put each command in a simple shell script and put the script in /usr/local/bin (on the path). This means the terminal does not have to be launched before clicking the command which mildly streamlines the process for launching such commands. You can do this with the other commands as well, but then you are always confined to work from your home directory which is often not ideal when dealing with multiple media files. The 4 bash scripts are the following:
You have a video with several different compositions. How do you cut the video to have separate videos for each composition? In its simplest useage (trimming), the ffmpeg command for this task has the following form:
ffmpeg -i input -ss ??:??:??.? -c copy -t ??:??:??.? output .
Here, input is the name of the video (for example, Beethoven.mp4), output is your chosen name for the cut (for example, Beethoven-sonata.mp4) and ??:??:??.? are relevant times in hours:minutes:seconds. The first time in the command (follows -ss, is the starting time of the cut; the second time (follows -t
, is the length or extent of the cut. Best quality is generally obtained by making the least (no) changes in the format. Thus,
ffmpeg -i Beethoven.mp4 -ss 00:13:26.0 -c copy -t 00:34:01.5 Beethoven-sonata.mp4
would create a new video named Beethoven-sonata.mp4 with length 34 minutes and 1.5 seconds, identical (equal in quality) to the part of Beethoven.mp4 between 13 minutes, 26 seconds and 47 minutes, 27.5 seconds. The command should be issued from the directory containing Beethoven.mp4, which is where Beethoven-sonata.mp4 will appear. You can do multiple cuts in the same input with a single command by simply adding a segment -ss ??:??:??.? -c copy -t ??:??:??.? output
in the command for each cut.
Concatenate means to join the end of one media file to the begining of a second one to create a combination file. The second entry in the AudioVidio section of the above menu is a template that applies to either audio or video. It applies to multiple pieces being joined. Concatating audio files is quite simple but video files can be challenging. This is because video files require joining more than one stream. With video or movies there are both audio and video streams, possibly multiple subtitle streams and maybe other special streams. Ffmpeg has to find all these streams and correctly join similar streams. So there is not much tolerance for sloppy commands when joining videos. Any number of like media can be concatenated in one simple step provided their streams match, that is, are of the same type (same formats, bit rates, time base, frame rate, frame size, containers, etc). Stream information on the files to be concatenated can be always obtained by applying to each piece the Media info entry from the Miscellanious section of the submenu, that is, by runing ffmpeg -probesize 1000000M -analyzeduration 1000000M -i input -hide_banner for each file.
The easiest and safest way to concatenate with ffmpeg is to use your text editor to first create an ordered list, mylist.txt of the names of the files to be joined. You can either do this by hand or, when there are a large number of files to join, use some code to automatically create mylist.txt. The latter can be easily done using printf: printf "file '%s'\n" *.xyz > mylist.txt. This code will properly make a proper list of all the files of type .xyz in the directory that it is launched. So you need to ascertain no other .xyz files are in the directory! A template for a proper mylist.txt is pictured on the right.
The complete code that both creates mylist.txt and then pipes it into a simple concatenate ffmpeg command is the following: printf "file '%s'\n" *.xyz > mylist.txt | ffmpeg -f concat -i mylist.txt -c:v copy -c:a copy -c:s copy output.xyz.
Because xdotool has difficulty with typing expressions containing too many apostrophes, I have to use a different procedure to get this command on the menu. I put the complete concatenate command template in a text file, name it myfile, make it only readable and put it in /usr/local/bin. The command ( medit --geometry=120x90+0+0 -l 1 /usr/local/bin/myfile) simply uses my text editor, medit, to launch a text file of this command template in a minumum window in the upper left corner of the screen with the cursor at the start of the command. If you do not have medit installed, then substitute the name of your text editor for medit. I like medit because it is only linux text editor (to my knowledge) in which I can control the geometry of its launch. All that remains for you to do is edit the command parameters in the text file (easier than editing in a terminal) to your situation, that is, name the output including file type (.xyz=same as input files in mylist.txt) and if you are just concatenating audio files, then you might spare ffmpeg some stress by removing the video (-c:v copy) and subtitle (-c:s copy) references. Copy and paste the completed command into a terminal, click the return key and - Bang! There is the concatenated file!
This command is set-up to just copy the various codecs, and this usually works. But ffmpeg can get confused when general commands are used. Sometimes better results are obtained by putting in some specific directions, an important one being an attempt to tell ffmpeg how to connect the streams using the map option: -map 0:a -map 0:v -map 0:s . This generally works provided there is only one stream of each type, all are labeled the same and all are of the same type (codec, bitrate, etc). If any of these 3 conditions does not hold, then ffmpeg has to guess what to do, or just leaves out the ambiguous streams alltogether. Identification problems like this can be sometimes circumvented by identifying a specific stream in the command in place of the general designation. For example, if stream 0:2 is an audio stream of the same type in all the files being joined, then putting -map 0:2 into the command will force that stream to be the audio stream in the output regardless of any other audio streams in the components.
Changing the format of a video is fairly complicated and really depends upon the end useage desired. Radical format changes generally reduce over-all quality, so format changes should be kept to a minimum. In the above menu, we give only 1 video formatting command, namely, a command to create a reasonably high quality video using the popular libx264 codec. The tag to notice in this command is crf 23, which stands for Constant Rate Factor. The Constant Rate Factor (CRF) is the quality and size control monitor for the x264 encoder. You can set the values between 0 and 51, where lower values would result in better quality (at the expense of higher file sizes). Sane values are between 18 and 28. Your choice for "-crf x" is very important in video output. The default for x264 is x=23, so you can use this as a starting point. Putting x=0 results in lossless video whose size will likely be several GB per minute, and is generally not practical. At the higher end (35≤x≤51), the size will be very small, but the video will be fuzzy and probably not worth watching. If you can bear the weight (like 500 MB/minute) use -crf 18 for an almost perfect picture, or if you want to conserve weight (like 5 MB/minute) use -crf 28 and still get a good picture.
One of the files that I put in ~/bin/ffmpeg is a help-file, ffmpeg-help.html, which can be quickly launched by clicking the last item in the submenu. This file contains special ffmpeg commands and links of which I need to be constantly reminded. It includes the tables below, which show the common audio and video options used in commands, the general form of an ffmpeg command and links to internet sights that have an excellent set of examples illustrating more complicated commands. This is convenient to have readily accessible and is easily supplemented with new information and commands. Just copy and paste the information below to make your own help file. If you do not know html, then make it as a text file and use your text editor in the command to launch it. Or perhaps easiest of all, download my expanded version from this website:
wget http://lxlinux.com/ffmpeg-help.html.
| bitrate | -b:a 320K |
| channels | -ac 2 |
| codec | -c:a copy |
| codec | -c:a libmp3lame -f mp3 -b:a 320k |
| codec | -c:a libvorbis -f ogg -b:a 320k |
| codec | -c:a flac -f flac |
| disable audio | -an |
| format | -f mp3 |
| sample rate | -ar 44100 |
| -metadata artist="Yo Yo Ma/London Symphony" |
| -metadata:s:s:4 language=eng |
| -metadata title="Adagio for Strings" |
| bitrate | -b:v 4000K |
| codec | -c:v copy |
| codec (-crf 0 is lossless, usually set 18 to 28) | -c:v libx264 -crf 18 -vf yadif |
| disable vidio | -vn |
| deinterlace filter | -vf yadif |
| double volume | -af volume=2.00 |
| frame rate | -r 25 |
| max size bytes | -fs 2000000000 |
| presets (slower means more compression) | -presets medium (ultrafast, superfast, veryfast, faster, fast, medium, slow, veryslow) |
| profile (higher better) | -profile:v high (main, baseline) |
| screen | -aspect 16:9 |
| copy all streams when 1 stream each | -map 0 |
| copy audio streams | -map 0:a |
| copy stream 5 | -map 0:5 |
| copy video, copy audio | -c:v copy, -c:a copy |
| copy subs |
-c:s copy -c:s mov_text -scodec copy |
| targets |
-target vcd svcd, dvd, dv, dv50, pal-vcd, ntsc-svcd |
| convert any video | ffmpeg -i input -r 25 -b:a 128k -b:v 4000k output.mp4 |
| convert for cd | ffmpeg -i video.mpg -target vcd vcd_video.mpg |
| convert for dvd | ffmpeg -i input.avi -target pal-dvd -ps 2000000000 -aspect 16:9 output.mpg |
| format target film 24fps | ffmpeg -i video.VOB -target film-dvd output.mpg |
| format target dvd 30fps | ffmpeg -i video.VOB -target ntsc-dvd output.mpg |
| format x264 (no subs) | ffmpeg -i input -c:v libx264 -preset ultrafast -qp 0 -c:a copy output.mkv |
| play audio | ffmpeg -i input -f alsa default ffmpeg -i input -f pulse default ffplay input |
| split video into images | ffmpeg -i video.flv image%d.jpg |
| make images into a video | ffmpeg -f image2 -i image%d.jpg imagestovideo.mpg |
| extract audio | ffmpeg -i video.flv -vn -ar 44100 -ac 2 -b:a 320K -f mp3 audio.mp3 |
| extract video | mplayer -dumpstream dvd://31 -nocache -noidx -dumpfile Movie.mpg |
| mix video and audio | ffmpeg -i audio.mp3 -i video.avi mix.mpg |
| Concat .vob using cat | cat *.vob > Allfiles.vob |
| Audio Codecs: | flac > libopus > libvorbis >= libfdk_aac > aac > libmp3lame >= eac3/ac3 > libtwolame > vorbis > mp2 > wmav2/wmav1 |
| Online FFMPEG Examples | |
| 19-ffmpeg-commands-for-all-needs | 15-ffmpeg-commands |
| Superuser Cheat | Tux Radar - Audio |
| Wiki Guide Index | Wiki Guide 2 |
| Subtitle Guide | ArchLinux Guide |
| FatbellyMan | Rip A Video |